Anyone who really wants to dig into the hobby of growing mushrooms needs to learn how to deal with nutrient agar. Not only is it a way to experiment and learn to grow mushrooms more effectively, it allows you to save and propagate cultures, allows you to create your own spawn and liquid cultures, and best of all… its fun! I want to show you how the best way to make agar petri dishes for growing mushrooms at home. Scroll to the bottom of the article for a video of the process!
Step 1: Mix up dry ingredients
There are lots of different recipes for agar mix, including PDA (potato dexrose agar), MYA (malt yeast agar) and even DFA (dog food agar), but they all consist of essentially the same idea- adding some sort of food source to agar to create a nutrient rich agar media for mushroom cultures. The mix we use most is Malt Extract Agar. For 1000 ml of water you’ll need to mix up:- 20g agar agar
- 20g malt extract (we use barley malt extract)
- 2 g nutritional yeast

Tools for the job, yeast, agar agar and barley malt extract.
Step 2: Add water and sterilize
Mix your dry ingredients in correct proportions with hot tap water. If the water is too cold it will start to set up right away and will be difficult to mix properly. The agar mix will have to be sterilized at 15 psi for 45 minutes to kill all potential contaminants. I like to use a whisky bottle with a modified lid for sterilization and pouring. To do this, simply drill a hole in the lid and pull some through some pillow stuffing. This filter will allow for sterile gas exchange while the agar cools off after sterilization. Cover the lid with tinfoil and place in the pressure cooker. Whisky bottle with modified lid.

Place in pressure cooker. The extra jars allow the bottle to sit in there at an angle.
A common problem when sterilizing agar in a pressure cooker is boiling over. This caused when the water outside the bottle cools off faster than the agar inside the bottle, which forces the agar to boil over through the filter, making a mess in your cooker. A way to remedy this is by adding lots of water to your pressure cooker so that the cool off rates will be similar. I usually place the bottle in the pressure cooker at an angle so that most of the agar will be at the same level as the surrounding water. Boil over rarely ever occurs if using this method.
Step 3: Cool down
Once the agar is sterilized, it will need to cool down sufficiently to be able to handle it, but be warm enough so that it remains in its liquid form. This usually takes at least a couple of hours. This is a good time to prepare the area where you will pour your plates and washing up for sterile work. Using agar requires an extremely high level of cleanliness and attention to potential contaminates. Any mold spore or other contaminant in the air, from your skin or fingernails or breath, could ruin your project. If a contaminate lands on your petri dish at any time, it will likely sprout into action, ruining your potential projects and cultures. Wearing hands and arms, wearing freshly laundered clothes, wearing nitrile gloves and even surgical masks can greatly increase your chances of success. You will also need to use a “still air box” ( SAB for short) or even better- laminar flow hood. These tools will provide a clean area to pour your plates, and without using either of them, it is almost certain that your plates will contaminate. A SAB can be as simple as a clear tote with a lid, and holes cut for arms. Use alcohol to clean the inside of the SAB and make sure that everything that goes in and out are both clean. If using a flow hood, turn it on a couple hours before intended use to scrub the air. Wipe the surface of the counter with alcohol and set up everything you think you will need.
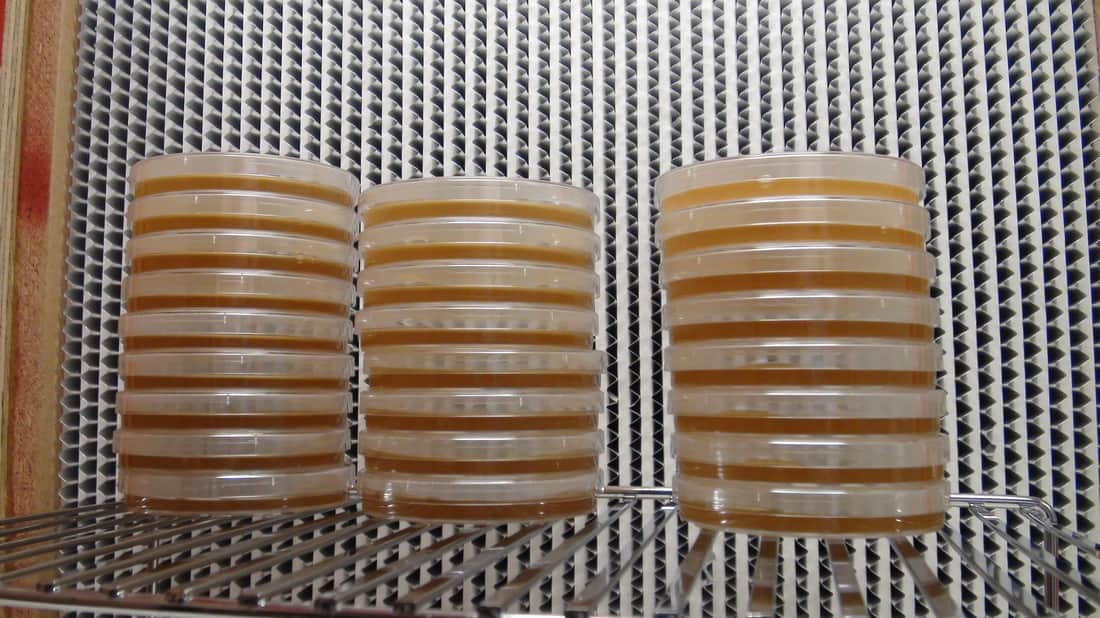
This picture was taken mid pour. Note how the plates are stacked. The plates should be filled starting with the bottom one and working your way up. Also note the open bottle is upstream of everything else.
Step 4: Pour the plates
Start by stacking the plates in front of your flow hood or in your SAB in a sanitary manner. This is where disposable plastic petri dishes work best. They usually come in a pre-sealed and sterilized pack of 25. Clean the outside of the bag with alcohol, cut the bag on the bottom and slide the bag off the plates. Arrange them in about 3 or 4 evenly tall stacks. Remove the tinfoil from the agar bottle and open the lid. If using a laminar flow hood, ensure that the mouth of the bottle remains in the sanitary flow of the hood. Start pouring the dishes in a rhythmic manner starting from the bottom plate and working your way up. Add just enough agar so that the bottom of the dish is completely covered. Try to leave the lid of the petri dish open for as little time as possible. Also, ensure no part of your hands touches the inside of the dish. Once all your dishes are poured, leave them to cool. If using a flow hood, leave the hood on while cooling. This will cool them off faster and prevent contaminants from being sucked into the dish while it cools down.
Fill plates with just enough agar to cover the bottom of the plate.
Step 5: Seal and store
It will take about 45 minutes to 1 hour for your plates to cool down and solidify. Some of the plates will have condensation on top. This will eventually dissipate and is not a problem. At this point, you can either use them directly for agar work or seal them for later use. In order to prevent contamination during storage you will need to seal the edges of the petri dish. The best option for this is laboratory parafilm. It provides a breathable but contaminate preventing barrier that easily wraps around your dishes. Simply cut off a slice of about 3-4 inches long, peel off the paper and fold in half. Then wrap around your dish, stretching it enough so that it sticks to the edges of the plate.
Stretch the parafilm around the edges of the plate.

A freshly poured and ready to go plate.
Now you have nutrient rich agar media! You can use it to propogate cultures, store cultures for long term use, germinate spores and even clone mushroom fruitbodies.
Feel free to add questions or comments below!
Here are some products that you might find useful for agar work. We especially recommend parafilm!